
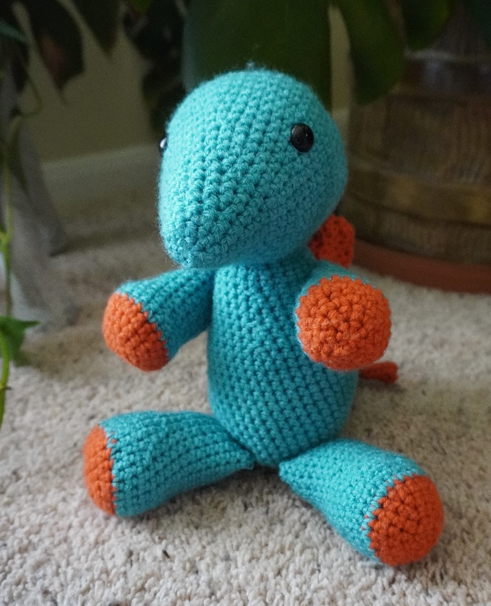
As I mentioned briefly in my Dilophosaurus pattern post, I just kind of went hog wild making crochet dinosaurs for a while there. I was making them nonstop for something like 6 months and burned out so hard, but before the burnout took full effect, I made this adorable Stegosaurus plushie. He’s so stupid and cute, I love him to bits. If you want the PDF, that is available on my Ravelry here.
Stegosaurus Plush Dinosaur Pattern

I found this dinosaur to be a very “trust the process” type of dinosaur, as opposed to all the other ones I have made. I can’t tell you how many times I almost gave up and unraveled the whole thing, but once I started putting him together and he wasn’t just a pile of arms, legs, and body parts, he actually came together and looks pretty sharp!
When you put him all together, if something doesn’t look right to you or you want to switch it up a little with the placements of the plates or the position of the head, don’t be afraid to screw around with it and make it your own and do what works best for you.
Difficulty: Beginner/Intermediate
Materials:
- Worsted Weight Yarn (2 colors)
- 5mm crochet hook
- Tapestry needle
- Quilting pins
- Stitch markers
- Craft safety eyes
- Scissors
- Poly-fil/Fiber Fill stuffing
Pattern Notes:
When starting a new row, don’t chain 1 to begin the next row. Mark the first stitch of the row and crochet all the way around, the next row begins at that first marked stitch. Just crochet right into that marked stitch. Don’t forget to mark the first stitch of each new row. You’re going to use it a lot in this pattern.
To secure the yarn in place after finishing, chain 1, snip the yarn off (leaving a tail for sewing usually), and pull the yarn all the way through the chain to create a knot. Don’t worry about if that will be visible later, when you sew it all together, you won’t even know it’s there.
Stitches and Abbreviations
Sc = single crochet
Inc = increase (2 single crochet in the same stitch)
Dec = decrease (sc two stitches together using the back loops only. Insert the hook into the back loop of the first stitch, go into the second stitches back loop, draw up some yarn, pull through all three loops on your hook)
MC = magic circle/magic ring
st/sts = stitch/stitches
[*] = repeat until end of row (ex: “*Inc, Sc in next st” = Inc, sc, inc, sc, inc, sc…)
HEAD:
(With primary color)
R1: Sc 6 in MC
R2: Inc in each st (12 sts)
R3-4: Sc evenly around (12 sts)
R5: *Inc, 1 sc in next st (18 sts)
R6-7: Sc evenly around
R8: *Inc, sc in each of the next 2 sts (24 sts)
R9: *Inc, sc in each of the next 3 sts (30 sts)
R10-11: Sc evenly around (30 sts)
R12: *Inc, sc in each of the next 4 sts (36 sts)
R13: Sc evenly around (36 sts)
R14: *Inc, sc in each of the next 5 sts (42 sts)
R15: *Inc, sc in each of the next 6 sts (48 sts)
R16-20: Sc evenly around 5x (48 sts)
Place/Insert eyes between row 14 and 15 with 14 sts between them.
R21: *Dc, sc in each of the next 6 sts (42 sts)
R22: Sc evenly around (42 sts)
R23: *Dc, sc in each of the next 5 sts (36 sts)
R24: *Dc, sc in each of the next 4 sts (30 sts)
R25: *Dc, sc in each of the next 3 sts (24 sts)
R26: *Dc, sc in each of the next 2 sts (18 sts)
Fill head with stuffing
R27: *Dc, sc in next stitch (12 sts)
R28: Dc around 6 times (6 sts)
Secure and tie off, cut a long tail for sewing the head fully closed. Secure off again and push the needle and yarn through the head and cut off.

BODY:
(With primary color)
R1: 6 sc in MC
R2: Inc in each st (12 sts)
R3: *Inc, sc in next st (18 sts)
R4: *Inc, sc in each of the next 2 sts (24 sts)
R5: *Inc, sc in each of the next 3 sts (30 sts)
R6: *Inc, sc in each of the next 4 sts (36 sts)
R7: *Inc, sc in each of the next 5 sts (42 sts)
R8-19: Sc evenly around
R20: *Dc, sc in each of the next 5 sts (36 sts)
R21: Sc evenly around
R22: *Dc, sc in each of the next 4 sts (30 sts)
R23-24: Sc evenly around
R25: *Dc, sc in each of the next 3 sts (24 sts)
R26: Sc evenly around
R27: *Dc, sc in each of the next 2 sts (18 sts)
Secure and tie off, leaving a long tail for sewing the head on later.

ARMS: (make 2)
(Starting with Secondary color)
R1: 6 sc in MC
R2: Inc in each st (12 sts)
R3: *Inc, 1 sc in next st (18 sts)
R4: *Inc, sc in each of the next 2 sts (24 sts)
(switch to primary color)
R5: Sc evenly around
R6: *Dc, sc in each of the next 4 sts (20 sts)
R7: Sc evenly around (20 sts)
R8: *Dc, sc in each of the next 3 sts (16 sts)
R9-14: Sc evenly around (16 sts)
Stuff the arms and pinch closed,
R15: sc 8 sts into the top of the last row to crochet shut.
Tie off and leave a long tail for sewing.
LEGS: (make 2)
(Starting with secondary color)
R1: 6 sc in MC
R2: Inc in each st (12 sts)
R3: *Inc, 1 sc in next st (18 sts)
R4: *Inc, sc in each of the next 2 sts (24 sts)
(Switch to primary color)
R5: *Inc, sc in each of the next 3 sts (30 sts)
R6-7: Sc evenly around (30 sts)
R8: *Dc, sc in each of the next 3 sts (24 sts)
R9-10: Sc evenly around (24 sts)
R11: Dc, sc in each of the next 4 sts (20 sts)
R12-18: Sc evenly around (20 sts)
Fill with stuffing, pinch leg closed, and sc 10 sts into the top of the previous row to crochet shut. Tie off and leave a long tail for sewing.
TAIL:
R1: 6 sc in MC
R2-3: Sc evenly around 2x (6 sts)
R4: *Inc, 1 sc in next st (9 sts)
R5-6: Sc evenly around (9 sts)
R7: *Inc, sc in each of the next 2 sts (12 sts)
R8: Sc evenly around (12 sts)
R9: *Inc, sc in each of the next 3 sts (15 sts)
R10: Sc evenly around (15 sts)
R11: *Inc, sc in each of the next 4 sts (18 sts)
R12: Sc evenly around (18 sts)
R13: *Inc, sc in each of the next 5 sts (21 sts)
R14: Sc evenly around (21 sts)
R15: *Inc, sc in each of the next 6 sts (24 sts)
R16: Sc evenly around (24 sts)
Fill with stuffing, Tie off and leave a long tail for sewing.
PLATES: (make 6)
R1: 6 sc in MC
R2: Inc in each st (12 sts)
R3: Sc evenly around (12 sts)
R4: *Inc, 1 sc in next st (18 sts)
R5: *Dc, sc in each of the next 4 sts (15 sts)
R6: *Dc, sc in each of the next 3 sts (12 sts)
Do not fill with stuffing. Stitch closed with tail and leave the rest for sewing onto the body later during assembly.
TAIL SPIKES: (make 2)
R1: 4 sc in MC
R2-5: Sc evenly around (4 sts)
Tie off and leave a tail for sewing.
ASSEMBLY:
Head to body – Pin the head to the body with quilting pins. It should be attached from rows 12-18 on the underside of the head. If this doesn’t look right to you, pin the head in different positions to see what works best.
About ¾ of the way through, put more stuffing in the neck for support. If you think you are overstuffing the neck, you’re doing it right. You don’t want a bobblehead plushie.
Legs – Attach the legs between row 7 and 8 on the body with 3 stitches separating the legs in the front of the body. Line it up with the head to make sure they are centered.
Arms – Count 4 stitches down from the base of the head on either side of the body and stitch the arms on that 4th stitch. There should be 12 stitches separating the top of the arms across the chest and about 20 stitches separating the bottom of the arms.
NOTE: I usually count down four stitches from the head, and then 6 stitches to the right or left for the first arm and then 12 in the other direction for the other arm. More counting but less effort.
Tail – Attach the tail at row 7-14 of the body at the rear (Pin in place to check).
Plates – There will be three rows of plates: top two, middle two, and two on the middle/base of the tail.
Pin them in place first so you can get the placement just right for you.
Top plates should be attached from row 3 (counting from the base of the head) to row 8 or 9. Leave one empty stitch space between the top and middle plates. Top left/right plates should be separated by 4-5 stitches at the top of the body.
Middle plates should be attached from row 11-17 (counting from the top). Same as the top plates, the middle left/right plates should be separated by 4-5 stitches in the middle of the body.
Attach the Tail Plates onto the 3rd to last row (counting from the tip of the tail) down to row 9 (again, counting from the tip) and the left/right plates should be separated by 3 stitches down the middle.

Optional: take the remaining length of yarn tail after securing the plate, don’t cut it off yet, and stitch through the plates to make them flatter.
You can leave them poofy or flatten them, either way works.
Attach the tail spikes between rows 3 and 4 at the tip of the tail with about 3 stitches separating the tail plates and the spikes.

And you’re done!
If you have any questions about the pattern or construction, feel free to reach out to me via email at a.barbisch@yahoo.com or Instagram @Poseidons.Siren. I will do my best to help you with any trouble you may have. But when in doubt, frog it and make it work! <3
Pattern Copyright © 2023 AMANDA BARBISCH. ALL RIGHTS RESERVED.
Pattern may not be altered, copied, redistributed, or sold as your own pattern.
You may sell finished product as long as you credit me with the pattern.